Sunday, September 16, 2018

Digest Authenticated API should obey to CORS

On securing access to a service API, Digest Authentication delivers stronger security as Basic Authentication. In case the service API is invoked from JavaScript code via XMLHttpRequest, that client application must explicitly self obey to the Digest Authentication handschake. A convenient library to use for that is digestAuthRequest.js (although I had to tweak it a bit to get it working, for availability of CryptoJS within the library, and to apply only the 'path' part of the URL in generating the digest token). But also the API itself must obey to standards: thus the Digest Authentication protocol, but in addition also to the CORS protocol in case of cross domain usage. Otherwise modern browsers will refuse to read the authentication challenge returned by the API in the first step of the authentication handshake:
The rootcause is that XMLHttpRequest::getResponseHeader() method in its default mode can only access simple response headers, any of: Cache-Control, Content-Language, Content-Type, Expires, Last-Modified, and Pragma (see Using CORS). In this set, the WWW-Authenticate header is missing. So if you want to enable JavaScript clients of your API to successful Digest Authentication and use your API, you have to include that response header name in the value of 'Access-Control-Expose-Headers' response header.
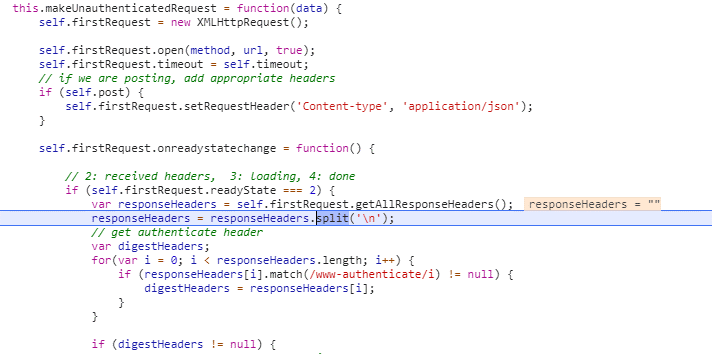
Without properly returned 'Access-Control-Expose-Headers by API, digestAuthRequest fails to access the required WWW-Authenticate header in case invoked from cross-domain JavaScript based client:
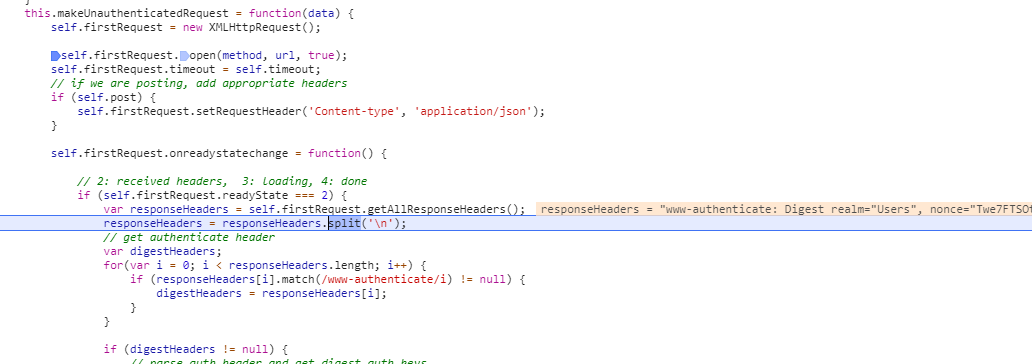
With properly returned 'Access-Control-Expose-Headers by API, digestAuthRequest succeeds to access the required WWW-Authentication header in case invoked from cross-domain JavaScript based client:

Wednesday, August 22, 2018

Resolve from conflict between 'Content-Approval' and SharePoint Workflow

Business usage scenario: content management capability to work on draft of data items first, and on peer approval publish copy of the data item into another list.
The business power user recognized self the richness of SharePoint building blocks to realize the scenario:
  1. Generic list with 'Content Approval' and 'Versioning' configured;
  2. SharePoint Designer Workflow on ItemChange; in which the approval status of item is checked, and on condition of 'Approved' create a copy of the item in the 'publish' location.
In theory this setup should function correct. However in (akward) SharePoint practice it does not:
  • The execution of the workflow triggered on ItemChange, results itself that the reached workflow stage is administrated as 'metadata' in the item on which the workflow is triggered.
  • And although the actual content of the item remains unchanged, the standard 'Content Approval' handling treats this as change towards the stage in which the data item was approved; and automatically resets the approval state to 'Pending';
  • When in the workflow the 'Approval Status' field is retrieved, it is therefore already reset to 'Pending'.
Thus not only the publication process fails due this reset of the condition value, but also the data item itself is reset; as if no 'Approval/Reject' decision was made by the peer reviewer. This is beyond confusing, also frustrating; and does not help in adoption of SharePoint as underlying business platform.
The business user consulted me for help. I quickly learned that the experienced behavior is a known issue in the combination of 'Content Approval' and SharePoint Designer Workflow. A functional error which cannot be prevented, that is when utilizing the out-of-the-box building blocks 'Content Approval' plus Workflow. A possible way-out is then to 'build' a custom 'Content Approval'. But that I consider a non-desired and weak approach. The OOTB Content Approval is available to use - for business users via configuration -, so that should be respected and acknowledged.
As prevention upfront is thus not possible, I switched to an approach in which to mitigate afterwards. In the triggered workflow, retrieve the 'approval status' of the previous version of the current item, and use that for the condition evaluation. If 'approved', then publish the item; and in addition also from the workflow execution restore the approved state in the item. The beauty here is that also in this mitigation the richness of the SharePoint platform can be utilized: SharePoint REST Api to retrieve previous version of data item, and standard SPD workflow actions to call Http Web Service plus set the approval status of data item.

Thursday, July 12, 2018

Utilize Azure Function Proxy to resolve lack of CORS aware within passive OAuth authentication flow

The steps to issue OAuth based authenticated SharePoint Online REST API calls from a SharePoint-external client context are well-documented elsewhere, e.g. within Access SharePoint Online using Postman. What is missing in these outlines is the notification that in case the external client is a Javascript based webapplication, the setup will fail due Cross-Origin aka Cross-Domain security protection by modern browsers; unless put in unsafe mode (not recommended!). The problem is here not within the modern browsers, as these are all CORS prepared / supporting. The real cause is that the REST call to 'https://accounts.accesscontrol.windows.net/<tenantid>/tokens/OAuth/2' does not return a CORS aware response; and a browser running in safe mode will refuse to accept the response coming from this different domain.

Browser / Cross-Domain issue

Augment the response to be CORS-aware

For browsers to accept the cross-domain OAuth authentication flow, solution is to modify the received response such that it is augmented with the needed CORS headers. In a first attempt, I tried to augment the response via overriding the (methods of the) XMLHttpRequest object in JavaScript. But not surprisingly this fails: the browser built-in Cross-Origin protection inspects the HTTP response on native level, and cannot be deceived by manipulating the received HTTP response within JavaScript runtime context. From security perspective this makes sense, otherwise the Cross-Origin protection could easily be avoided (seduced) in malicious code.
The valid approach is that the HTTP response as received on HTTP protocol level will itself include the missing CORS headers, before reaching the calling browser. Of course it is not possible to modify as Office 365 customer organization the behavior of the external hosted Microsoft SaaS service. So we need to 'proxy' the external service endpoint, and include the missing CORS headers in the proxy response. Previously this would require to either utilize the capabilities of a reverse proxy in the organization's landscape, or custom code an own endpoint that acts as proxy between the client and the invoked (external) service. But last year Microsoft released the concept of Azure Function Proxy, and this can out-of-the-box be used in a no-code / configuration-only manner to proxy the call to 'https://accounts.accesscontrol.windows.net/<tenantid>/tokens/OAuth/2'.

Configure the Azure Function Proxy

Browser / Cross-Domain allowed via Azure Function Proxy

Tuesday, June 12, 2018

Inject dynamic-filtering into classic-mode ListView

Earlier in my SharePoint "life", I delivered a capability in which a COTS application UI with an ASP.NET GridView, was on-the-fly augmented with dynamic filtering by utilizing list.js library: On-the-fly add client-side filtering and sorting to GridView. On occasion I refer to this as an showcase of how with simple means, a richer user experience can be delivered in SharePoint context. Last week I showed this again, and also this business user was charmed by it. But he asked to have it applied to a standard SharePoint ListView, in particular one in datasheet/quick-edit layout. I took on this challenge, and with successful result.
Screenshots to visualize the effect:
The capability itself is delivered as generic utility and deployed via private CDN. To activate on a list-view page, one merely needs to include reference to the EnrichListView.js library via a ScriptEditor webpart.

High level architecture Microsoft Stream

For reference:

Sunday, May 20, 2018

Authenticate from Curl into SharePoint Online with Modern Authentication

Code-snippet for interoperability from Curl context - for example, could be from a Linux or MacOS workstation / server -, to Office 365 SharePoint Online; with service-based authentication by applying Active / Modern Authentication protocol handling:
#General variables
ProxyAccount="sa-curlAccount"
ProxyPassword="******************"
ProxyProtocol="http"
ProxyServer="xxx.xxx.xxx.xxx"
ProxyPort="8080"
SharePointCurlAccount="sa-curlAccount"
SharePointOnlineTenant="<URL of SharePoint Online tenant>"
UploadFile="<file to upload>"
UploadLocation="<URL of SharePoint Document Library>"

#Fixed variables
OUTPUT=${HOME}/Interop/output
TMP=${HOME}/Interop/tmp/spo

#the following steps are required to upload data from Curl context to SharePoint Online:
#
#1. Retrieve an authentication cookie to Office 365 through invocation of webservices
#1.a. (Optional) Step 0: determine the URL of the custom Security Token Service (STS) to next
#     request a SAML:assertion for account identified by credentials
#1.b. Step 1: request SAML:assertion from the identified custom STS for account identified by
#     credentials
#1.c. Step 2: use the SAML:assertion to request binary security token from Office 365
#1.d. Step 3: use the binary security token to retrieve the authentication cookie
#2. Step 4: Use that Office 365 authentication cookie in subsequent webservice requests to
#   SharePoint Online REST API
 
#1.a. (Optional) Step 0: determine the URL of the custom Security Token Service (STS) to next
#     request a SAML:assertion for account identified by credentials (outside datacenter, with proxy)
curl -U ${ProxyAccount}:${ProxyPassword} -k -x ${ProxyProtocol}://${ProxyServer}:${ProxyPort} -X POST -H "Content-Type: application/x-www-form-urlencoded" -d "login=${SharePointCurlAccount}&xml=1" https://login.microsoftonline.com/GetUserRealm.srf -w "\n" > ${TMP}/O365_response_step_0

#Extract requested STSAuthURL from response step 1
STSURL=`sed -n 's:.*<STSAuthURL>\(.*\)</STSAuthURL>.*:\1:p' ${TMP}/O365_response_step_0`

#Create input for step 1
File: O365_request_step_1-1

<?xml version="1.0" encoding="UTF-8"?>
<s:Envelope
    xmlns:s="http://www.w3.org/2003/05/soap-envelope"
    xmlns:wsse="http://docs.oasis-open.org/wss/2004/01/oasis-200401-wss-wssecurity-secext-1.0.xsd"
    xmlns:saml="urn:oasis:names:tc:SAML:1.0:assertion"
    xmlns:wsp="http://schemas.xmlsoap.org/ws/2004/09/policy"
    xmlns:wsu="http://docs.oasis-open.org/wss/2004/01/oasis-200401-wss-wssecurity-utility-1.0.xsd"
    xmlns:wsa="http://www.w3.org/2005/08/addressing"
    xmlns:wssc="http://schemas.xmlsoap.org/ws/2005/02/sc"
    xmlns:wst="http://schemas.xmlsoap.org/ws/2005/02/trust">
    <s:Header>
        <wsa:Action s:mustUnderstand="1">http://schemas.xmlsoap.org/ws/2005/02/trust/RST/Issue</wsa:Action>
        <wsa:To s:mustUnderstand="1">https://sts.<tenant>.com/adfs/services/trust/2005/usernamemixed</wsa:To>
        <wsa:MessageID>b07da3ec-9824-46a5-a102-2329e0c5f63f</wsa:MessageID>
        <ps:AuthInfo
            xmlns:ps="http://schemas.microsoft.com/Passport/SoapServices/PPCRL" Id="PPAuthInfo">
            <ps:HostingApp>Managed IDCRL</ps:HostingApp>
            <ps:BinaryVersion>6</ps:BinaryVersion>
            <ps:UIVersion>1</ps:UIVersion>
            <ps:Cookies></ps:Cookies>
            <ps:RequestParams>AQAAAAIAAABsYwQAAAAxMDMz</ps:RequestParams>
        </ps:AuthInfo>
        <wsse:Security>
            <wsse:UsernameToken wsu:Id="user">
                <wsse:Username>sa-curlAccount@<tenant>.com</wsse:Username>
                <wsse:Password>*************</wsse:Password>
            </wsse:UsernameToken>
            <wsu:Timestamp Id="Timestamp">
File: O365_request_step_1-2

            </wsu:Timestamp>
        </wsse:Security>
    </s:Header>
    <s:Body>
        <wst:RequestSecurityToken Id="RST0">
            <wst:RequestType>http://schemas.xmlsoap.org/ws/2005/02/trust/Issue</wst:RequestType>
            <wsp:AppliesTo>
                <wsa:EndpointReference>
                    <wsa:Address>urn:federation:MicrosoftOnline</wsa:Address>
                </wsa:EndpointReference>
            </wsp:AppliesTo>
            <wst:KeyType>http://schemas.xmlsoap.org/ws/2005/05/identity/NoProofKey</wst:KeyType>
        </wst:RequestSecurityToken>
    </s:Body>
</s:Envelope>
cat ${TMP}/O365_request_step_1-1 > ${TMP}/O365_request_step_1 echo "<wsu:Created>`date -u +'%Y-%m-%dT%H:%M:%SZ'`</wsu:Created>" >> ${TMP}/O365_request_step_1 echo "<wsu:Expires>`date -u +'%Y-%m-%dT%H:%M:%SZ' --date='-15 minutes ago'`</wsu:Expires>" >> ${TMP}/O365_request_step_1 cat ${TMP}/O365_request_step_1-2 >> ${TMP}/O365_request_step_1 #1.b. Step 1: request SAML:assertion from the identified custom STS for account identified by # credentials (internal datacenter, without webproxy to outside) curl -X POST -H "Content-Type: application/soap+xml; charset=utf-8" -d "@${TMP}/O365_request_step_1" ${STSURL} -w "\n" > ${TMP}/O365_response_step_1 #Extract requested SAML:assertion from response step 1 sed 's/^.*\(<saml:Assertion.*saml:Assertion>\).*$/\1/' ${TMP}/O365_response_step_1 > ${TMP}/O365_response_step_1.tmp #Create input for step 2
File: O365_request_step_2-1

<?xml version="1.0" encoding="UTF-8"?>
<S:Envelope
    xmlns:S="http://www.w3.org/2003/05/soap-envelope"
    xmlns:wsse="http://docs.oasis-open.org/wss/2004/01/oasis-200401-wss-wssecurity-secext-1.0.xsd"
    xmlns:wsp="http://schemas.xmlsoap.org/ws/2004/09/policy"
    xmlns:wsu="http://docs.oasis-open.org/wss/2004/01/oasis-200401-wss-wssecurity-utility-1.0.xsd"
    xmlns:wsa="http://www.w3.org/2005/08/addressing"
    xmlns:wst="http://schemas.xmlsoap.org/ws/2005/02/trust">
    <S:Header>
        <wsa:Action S:mustUnderstand="1">http://schemas.xmlsoap.org/ws/2005/02/trust/RST/Issue</wsa:Action>
        <wsa:To S:mustUnderstand="1">https://login.microsoftonline.com/rst2.srf</wsa:To>
        <ps:AuthInfo
            xmlns:ps="http://schemas.microsoft.com/LiveID/SoapServices/v1" Id="PPAuthInfo">
            <ps:BinaryVersion>5</ps:BinaryVersion>
            <ps:HostingApp>Managed IDCRL</ps:HostingApp>
        </ps:AuthInfo>
        <wsse:Security>
File: O365_request_step_2-2

        </wsse:Security>
    </S:Header>
    <S:Body>
        <wst:RequestSecurityToken xmlns:wst="http://schemas.xmlsoap.org/ws/2005/02/trust" Id="RST0">
            <wst:RequestType>http://schemas.xmlsoap.org/ws/2005/02/trust/Issue</wst:RequestType>
            <wsp:AppliesTo>
                <wsa:EndpointReference>
                    <wsa:Address>sharepoint.com</wsa:Address>
                </wsa:EndpointReference>
            </wsp:AppliesTo>
            <wsp:PolicyReference URI="MBI"></wsp:PolicyReference>
        </wst:RequestSecurityToken>
    </S:Body>
</S:Envelope>
cat ${TMP}/O365_request_step_2-1 > ${TMP}/O365_request_step_2 cat ${TMP}/O365_response_step_1.tmp >> ${TMP}/O365_request_step_2 cat ${TMP}/O365_request_step_2-2 >> ${TMP}/O365_request_step_2 rm ${TMP}/O365_response_step_1.tmp #1.c. Step 2: use the SAML:assertion to request binary security token from Office 365 # (outside datacenter, with proxy) curl -U ${ProxyAccount}:${ProxyPassword} -k -x ${ProxyProtocol}://${ProxyServer}:${ProxyPort} -X POST -H "Content-Type: application/soap+xml; charset=utf-8" -d "@${TMP}/O365_request_step_2" https://login.microsoftonline.com/RST2.srf -w "\n" > ${TMP}/O365_response_step_2 #Extract requested binary security token from response step 2 sed 's/^.*\(<wsse:BinarySecurityToken.*wsse:BinarySecurityToken>\).*$/\1/' ${TMP}/O365_response_step_2 > ${TMP}/O365_response_step_2.tmp #Create input for step 3 cat ${TMP}/O365_response_step_2.tmp | cut -d'>' -f2 | cut -d'<' -f1 > ${TMP}/O365_request_step_3 BinarySecurityToken=`cat ${TMP}/O365_request_step_3` rm ${TMP}/O365_response_step_2.tmp #1.d. Step 3: use the binary security token to retrieve the authentication cookie (outside # datacenter, need to pass webproxy) curl -v -U ${ProxyAccount}:${ProxyPassword} -k -x ${ProxyProtocol}://${ProxyServer}:${ProxyPort} -X GET -H "Authorization: BPOSIDCRL ${BinarySecurityToken}" -H "X-IDCRL_ACCEPTED: t" -H "User-Agent:" ${SharePointOnlineTenant}/_vti_bin/idcrl.svc/ > ${TMP}/O365_response_step_3 2>&1 #Remove DOS ^M from response step 3 cat ${TMP}/O365_response_step_3 | sed 's/^M//' > ${TMP}/O365_response_step_3.tmp #Extract requested authentication cookie from response step 3 and create input for step 4 echo "Set-Cookie: SPOIDCRL=`cat ${TMP}/O365_response_step_3.tmp | grep Set-Cookie | awk -F'SPOIDCRL=' '{print $2}'`" > ${TMP}/O365_request_step_4 rm ${TMP}/O365_response_step_3.tmp #2. Step 4: Use that Office 365 authentication cookie in subsequent webservice requests to # SharePoint Online REST API (outside datacenter, with proxy) curl -U ${ProxyAccount}:${ProxyPassword} -k -x ${ProxyProtocol}://${ProxyServer}:${ProxyPort} -b ${TMP}/O365_request_step_4 -T "{${OUTPUT}/${UploadFile}}" ${UploadLocation} exit 0
Alternative for the upload handling; interoperation via SharePoint API / webservice:
curl -U ${ProxyAccount}:${ProxyPassword} -k -x ${ProxyProtocol}://${ProxyServer}:${ProxyPort} -X POST -H "Accept: application/json;odata=verbose" -d "" ${SharePointOnlineTenant}/_api/contextinfo > ${TMP}/O365_response_step_4_tmp

FormDigest=`sed -n 's:.*FormDigestvalue:\(.*\),.*:\1:p' ${TMP}/O365_response_step_4_tmp`
rm ${TMP}/O365_response_step_4.tmp

curl -U ${ProxyAccount}:${ProxyPassword} -k -x ${ProxyProtocol}://${ProxyServer}:${ProxyPort} -X POST -H "X-RequestDigest: @${FormDigest}; X-HTTP-Method: PUT” --data-binary  "{${OUTPUT}/${UploadFile}}"  ${SharePointOnlineTenant}/teams/siteX/_api/web/GetFileByServerRelativeUrl('Shared%20Documents/SubFolder/${UploadFile}')/Files/$value

Friday, May 11, 2018

How-to resolve peculiarity with .aspx file upload from automated client context

The capabilities (powers) of SharePoint as underlying business applications platform can be utilized in multiple ways. Example of a pragmatic one is to utilize SharePoint as authorized web-distribution platform for content created elsewhere. The added value it brings here are that the origin of the content itself does not need to be (made) accessible for the readers, no need to (web) serve content, the permission handling of SharePoint can be utilized to only make the content available for authorized persons.
This simple application usage is for instance applied to continuously publish and distribute system monitoring dashboard report on infra level from Linux servers to the monitoring people. They do not / are not allowed access to the Linux servers in the datacenter, but are granted access to SharePoint as application platform. This worked perfectly, until we recently migrated the hosting site from SharePoint on-prem to SharePoint Online.
The problem symptom is that the uploaded .aspx file on selecting it in the SharePoint Online UI, does not open in browser, but instead starts the ‘Download / Save As’ behavior. Which clearly obstructs the SharePoint role as host of the published infra dashboard. Other .aspx files in the same library that were migrated from the source site on-prem, all do open in the browser. That rules out document library settings. So it must be directly tied to the upload of the file. The particular upload is via Curl – which gave us some challenges to authenticate against SharePoint Online, but I will post on that separately -, but once uploaded nothing can be identified what clarifies why this file behaves different from the other .aspx files in the library. Inspected the document item properties, even up to detailed level via SharePoint Designer: all the same. The only noticeable difference is when trying to resolve in SharePoint Designer via file item properties the url to document: for the troublesome document this returns in ‘file not found’.
Strange, as the file is clearly present; and as such accessible both in the browser via the SharePoint listview UI, as when opening the library in Windows Explorer via ‘Open with Explorer’. Heck, even with sync via OneDrive, the file is included in the synced library content.
So this really kept us puzzled. Until business user self-remembered an action we did on restoring the upload via Curl: as good SharePoint citizen, I reduced the permission level of the automated client account from ‘Full Control’ to ‘Contributor’. This turned out to be the key to explaining and next resolving the issue. On SharePoint level, also uploaded .aspx files are treated as (content) page. And for completed upload + administration, the account uploading an .aspx file must have ”Add and Customize Pages - Add, change, or delete HTML pages or Web Part Pages, and edit the Web site using a Microsoft SharePoint Foundation-compatible editor”. And that permission is missing from “Contributor” permission level. It does have "Add items to library", and therefore the upload itself succeeds from the automated client context. But the next processing on SharePoint (Online) side after the file upload to convert it into a browsable page context is not allowed when only 'Contributor'. The needed permission is included in ‘Full Control’, but that gives away too much control to the automated client account. Applying ‘Least Privilege’security principle, I therefore configured a new Permission Level “Upload ASPX page”, included the needed permission, and assigned this permission level to the automated client account.